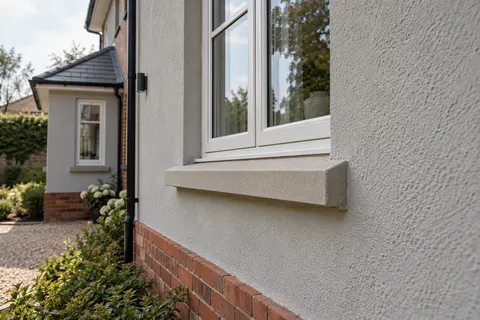
Coordinate replacement windows with external insulation
Coordinate replacement windows with external insulation
Ordering windows before deciding the wall build-up can leave a refurbishment with awkward details. External insulation moves the finished outside face, while a window order fixes dimensions and components that may be difficult to change later. Bring both designs together early, even if the work will be carried out under separate contracts.

On this page
Put both designs on one drawing
Ask for a section through the opening that shows the existing wall, proposed insulation and window position. It should include the reveal and sill, not merely the centre of the wall. An elevation drawing is useful for appearance but does not reveal how the layers meet. The designer needs to coordinate the detail across the relevant products and the existing construction.
This is especially useful when an older house and a new extension are being refurbished together. Their openings may look similar while their construction differs. Give each distinct opening type an appropriate detail rather than applying one generic sketch everywhere. Whole-house rendering can provide a common appearance, but the window interfaces still need to reflect the walls behind it.
| Decision | Agree with |
|---|---|
| Wall and frame section | Retrofit designer and window designer |
| Sill and reveal detail | System supplier and responsible installer |
| Sequence and protection | Builder, window contractor and renderer |
| Hidden-stage inspection | Named project inspector |
| Later repairs | Building owner using system records |
Decide the position before placing the order
Window position affects the depth of the reveal and its relationship with the new outside face. The appropriate arrangement depends on the building and retrofit design. Do not ask the installer to choose it in isolation on the fitting day. Record the agreed position and the information each trade needs to follow it, including any tolerances or outstanding survey checks.
If the existing windows are being retained, assess their condition and remaining suitability for the proposed work. The question is not whether every window must be replaced during insulation. It is whether the planned sequence makes sense. Replacing a poor window soon after the facade is complete can disturb several layers and require repairs that could have been avoided through earlier coordination.
Check the sill as a working detail
The sill must function with the final wall thickness and frame junction. Its projection, ends and drainage arrangement need to be considered together. A visually narrow edge may look neat in an elevation but provide an inadequate detail once the insulation and finish are installed. Ask the designer to show the completed section rather than relying on the sill fitted to the uninsulated wall.
Identify who supplies and fits any changed sill or extension detail. A quotation that excludes sills may still depend on them being altered. Put the excluded task into the project schedule with a named responsibility and timing. Otherwise the renderer can arrive to find that the only remaining options require disturbing new windows or improvising around an unsuitable projection.
Keep ventilation and drainage effective
Openings perform functions beyond admitting light. The retrofit assessment should consider ventilation, drainage and other relevant requirements at the building level. Exterior insulation must not simply cover every feature that interrupts a smooth appearance. Show the required openings and terminations on the design, and make sure the installation team can identify them on the actual wall.
The window supplier and insulation designer need compatible information about these details. A component accepted in one isolated product specification may not resolve the combined junction. Where advice is needed, obtain it before ordering. Keep the written answer and the construction it relates to, so a later change in frame or insulation system prompts the detail to be reviewed.
Agree which trade finishes each edge
List the tasks around the opening: removal, masonry making good, frame installation, perimeter detail, insulation reveal and decorative finish. Allocate them between the contracts. It is common for a gap to arise when each quotation assumes another trade handles the final interface. A responsibility schedule makes that gap visible while it can still be resolved calmly.
Render repair may be needed after window removal, even before the new insulated system begins. Describe the background repair separately from cosmetic making good. The material and condition must support the specified subsequent work. Ask for an inspection after the opening is prepared and the frame is installed, before the reveal construction conceals the adjoining background.
Protect the installation through the next stage
New frames and glazing need suitable protection during preparation and rendering. Agree the protection method, how it is checked and who removes it. It should not obstruct drainage or remain in a way that damages the frame finish. If other trades will work around the opening, tell them which completed details must not be drilled, cut or covered.
Weather can interrupt both window and facade work. The programme needs an arrangement for keeping the building appropriately protected between stages. Do not assume that installation and finishing will always occur on consecutive dry days. A temporary condition should be designed and managed as such, with a clear route to completing the permanent detail when the work resumes.
Approve appearance after the technical junction works
Once the interface is resolved, review the reveal depth, visible trims and colour against the rest of the elevation. Silicone rendering may provide the chosen decorative surface within the insulation system, but it must remain part of the supported build-up. A sample or detail mock-up can show the combination of frame, sill and finish more clearly than three separate colour samples.
If only some elevations are insulated, compare the resulting window appearance across the house. The difference may be acceptable or intentionally designed, but it should be understood before work. The wall rendering option for an uninsulated extension may require a different detail from the insulated original wall. Similar paint colours do not make the sections identical.


Keep the opening records at handover
Retain the final details, product information and relevant inspection photographs for each opening type. Future maintenance should be able to identify how attachments and repairs affect the insulated system. INCA's guidance highlights the need for suitable treatment of alterations and damage. A later installer should not assume the rendered reveal is solid masonry directly beneath the visible surface.
Check the finished openings while access remains available, including the sill ends, adjoining finish and reinstated fittings. Record any outstanding item by window reference rather than saying generally that the front needs attention. A location-based completion list is easier for separate trades to close without duplicating or overlooking work.
The Mansfield home-rendering guide explains how insulation, replacement finishes and repairs fit into a wider project. Use it to define the work packages, then coordinate their window interfaces in the actual design. The objective is a completed opening whose construction, appearance and future maintenance have all been considered before the last layer hides the junction.
Common questions
Must one contractor supply both windows and insulation?
Separate contractors can carry out the work if the design, responsibilities and programme are coordinated. Each needs the same current junction information and a clear handover point. Identify who accepts the completed opening before the insulation closes it, who protects the frames and who resolves any discrepancy. The important requirement is a joined-up construction detail and responsibility schedule, rather than a particular number of businesses on the project.
What if only one window needs replacing later?
Use the recorded wall and opening details when planning the replacement. The installer needs to understand the insulation, reveal construction, sill and weathering arrangement before disturbing them. The work may require a system-compatible repair rather than ordinary cosmetic making good. Retain the original product information and seek the relevant advice for the alteration. Planning for later maintenance does not eliminate all disturbance, but it gives the contractor a clearer basis for the method and repair scope.
Should colour approval wait until the windows are fitted?
A combined sample or mock-up can be reviewed earlier if it accurately represents the selected frame, sill and finish. Check the dry surface under suitable light and record the exact references. If one component changes, revisit the appearance decision as well as the technical interface. Approval of three isolated samples is less informative than seeing how the materials meet.
See housing and planning information for Mansfield and nearby places, including the source and geography behind each figure.