Render repair in Mansfield
Render repair in Mansfield
A crack, hollow patch and stain are different findings. They may occur together, but they should not automatically receive the same repair. Render repair begins with identifying the affected material and the likely reason for the defect, then deciding how much sound work can remain. The proposal should explain that decision before describing the final colour.

On this page
Describe the defect without guessing its cause
Photograph the complete elevation and then the affected area from a safe position. Include a fixed feature such as a window or downpipe so the location is easy to recognise. Note when the defect was first seen and whether it appears to change after rain or alterations. These observations help a surveyor; they do not establish a diagnosis on their own.
Separate cracks, detached material, staining and impact damage in the record. A dark patch may be surface contamination, repeated wetting or another issue that needs investigation. A crack may be confined to a coating or extend into the underlying construction. Where material could fall onto a route or entrance, arrange a competent assessment and appropriate precautions rather than trying to pull it off from a ladder.
Ask the surveyor to record the inspection method and its limits. Areas hidden by a conservatory or inaccessible at height should not be described as sound without evidence. If further access or opening up is required, include that stage in the programme. The quotation can then distinguish a confirmed repair from work whose extent remains provisional.
| Question | Evidence to seek |
|---|---|
| What is damaged? | Location, material and inspection findings |
| Why has it happened? | Relevant water, movement or impact assessment |
| What remains? | Basis for retaining surrounding work |
| How will it look? | Sample and agreed matching limitation |
| What is recorded? | Before, opened-up and completion information |
- Map the damage Tapping finds hollow areas; cracks and their likely cause are noted.
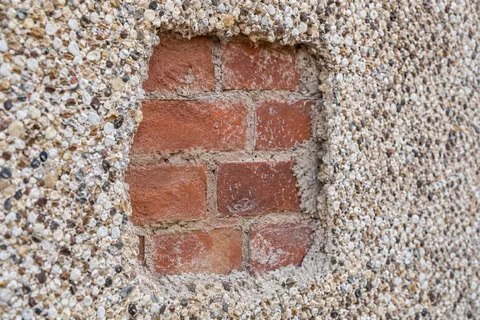
- Cut back Failed render is cut out to a sound edge, usually squared off.
- Fix the cause Leaking gutters, sills without drips or render below the DPC are dealt with.
- Rebuild in coats Using a material compatible with the surrounding render and masonry.
- Blend the finish Texture is matched; colour may need a coating over the wider area.
The usual order of work. The survey and the chosen products decide the actual steps.
Deal with the cause alongside the surface
Water from a defective gutter or downpipe can repeatedly affect the same part of a wall. The rainwater defect needs correction, with responsibility and timing agreed, before a decorative repair is treated as the complete answer. The same applies to an inadequate sill detail or an attachment that channels water towards the finish. Repairing only the visible mark can leave the original problem in place.
Movement requires a different discussion. Where a crack follows a junction between an extension and the original building, the design may need a movement detail rather than a rigid patch. Reinforcement can form part of a specified repair, but it does not make every moving interface suitable for seamless coverage. If the cause is uncertain or potentially structural, obtain the relevant assessment before specifying the surface treatment.
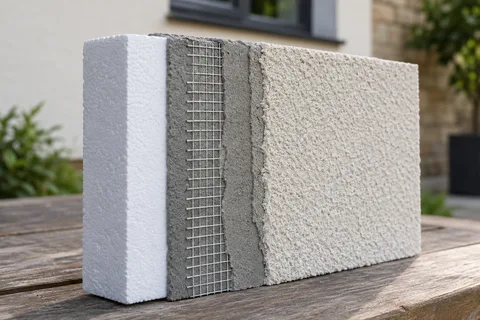
Impact damage and poorly made fixings may be more localised. Even then, establish the construction beneath the visible layer. A damaged external wall insulation system needs a system-compatible repair, including any affected insulation or reinforcement. It should not be treated as a simple hole in conventional render if deeper layers or weathering details have been disturbed.
Set a repair boundary from sound material
The repair area should extend to an appropriate sound edge, based on the inspection and chosen method. A tiny patch drawn around the visible crack may leave detached material immediately beside it. Conversely, a limited defect does not automatically justify stripping the whole house. Ask why the proposed boundary is suitable and which findings would cause it to be extended.
Removal should protect retained sound work and the background. Once the area is open, record the condition before rebuilding. If the actual background differs from the assumed construction, review the repair material and sequence. This is particularly important around old openings or previous repairs where several materials may meet beneath a single painted surface.
Lime rendering may be relevant for compatible repairs to traditional work. The repair specification needs to address the existing material, masonry and finish, rather than selecting the hardest available patching product. For modern systems, follow the supported repair approach and identify the product references. A repair that looks neat on day one still needs to behave appropriately with the surrounding wall.
Decide how visible the repair can be
Colour, texture and weathering all affect a patch's appearance. Discuss that before approving a small local repair on a prominent elevation. A representative cured sample can help establish what is achievable, but an exact invisible match should not be promised merely because the original product name is known. The surrounding surface may have changed since it was applied.
One option is to accept a compatible local repair with some visual difference. Another is to finish a complete panel after the repair, where the existing system and proposed coating permit it. Render respray can form part of that wider decorative treatment, but it needs its own preparation and compatibility assessment. Recoating does not substitute for resolving the underlying defect.
Compare those approaches with complete wall rendering where repairs would be extensive or the remaining surface is unsuitable. Put them against the same inspection findings and finish expectations. A cheaper-looking local proposal may assume a visible patch that the customer would reject, while a broader proposal may include a uniform panel finish. Clarifying the desired result makes the comparison fairer.
Inspect the repair before and after the finish
The programme should allow the specified repair materials to cure and dry under suitable conditions. Do not let the desire to finish the colour in one visit remove an important waiting or inspection stage. Ask how repaired areas are checked before being coated, and how they are protected if weather or other work interrupts the sequence.
Keep photographs of the opened area, background repair and completed result. Record any changed fitting or movement detail, along with the materials used. For a recurring defect, dated records make it easier to distinguish a new issue from a repeat at the same location. They also help a future contractor avoid drilling into a repaired junction without understanding its purpose.
Agree the final inspection against the original scope. Check the repair edges, adjacent retained work and any associated rainwater or attachment repairs. A handover should include care guidance and identify what was outside the investigation. No surface repair can confirm the condition of every concealed part of a building, so keep the record factual about what was inspected and completed.
Common questions
Is a photograph enough to fix the repair price?
A photograph can help identify the visible location and arrange an initial discussion, but it may not establish adhesion, material or concealed condition. A firm scope may need inspection and access. Any estimate based on limited information should state its assumptions and explain how the actual repair extent will be confirmed.
See housing and planning information for Mansfield and nearby places, including the source and geography behind each figure.